Evening everyone, it's been a fun old week here, with lots of comings and goings. We've hardly seen Oli since he passed his driving test last week but he's been a real sweetie and run a few errands including picking up his brother from college. It was lovely to hear the banter as they came home together. We seem to have a new boy in the house :-)
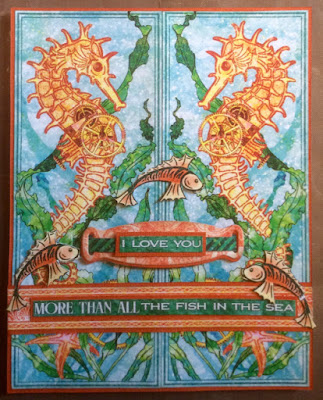
It's been a while since I've shared a card with you so I thought I'd show case one I've made using the Voyage Beneath the Sea collection by Graphic 45. The warm oranges and sea greens are lovely to work with and I could almost smell the as the card came together :-) The size of the card was determined by the two sea horse pictures joined together so its a little larger than the usual 7 x 5 or 6 x 6 cards we make but I loved how it came out.
Here's the supply list and how to make it:
Voyage Beneath the Sea 12 x 12 papers
Ocean Quest
Voyage Beneath the Sea
Deep Blue Dreams
Wild Wild Waves
Two 12 x 12 Kaisercard - Pumpkin
Rusty Hinge distress ink
Double sided tape and tacky glue
Spellbinder Ribbon Tag die
Start by making the easel card base in sections from Pumpkin Kaisercard. Base = 6 1/2" x 5", scored 1/2" in from one 6" edge, the back folded section = 6" x 10" (fold 6" edges together) and the front section = 6" x 7 1/4". Join pieces together with double sided tape. For the base papers cut one 7 1/8" x 5 7/8" from Ocean Quest and two pieces measuring 5 7/8" wide x 5" deep and 5 7/8" wide x 4 7/8" deep from Deep Blue Dreams. Stick in place on your card base.
Cut out the two sea horse pictures from Voyage beneath the Sea paper. Join together with seahorses facing using double sided tape on reverse. the two Sea Horse pictures together with double sided tape on reverse. Cut a 5" strip of the stripy border from Voyage beneath the Sea paper, thread through the loops in the ribbon tag, and through a couple of tiny slits cut just below the seaweed infant of the sea horse tails. Secure with double sided tape on reverse. Cut out the 'I love you' border strip and trim off the words 'I love you'. Mount on orange card and mount on a die cut ribbon tag.
Mount the remaining section of the word border on orange card, do the same of a 6" strip remaining orange border from Deep Blue Ocean, mat the two together and stick in place 1 1/4" up from bottom edge of Seahorse picture. Mat the picture on orange card, add foam pads to reverse and stick in place on your card front.
Add the three little fish to finish off your card.
Have fun if your planning some crafting over the weekend. I'm off to the ballet tomorrow with my mother in law. - Romeo and Juliet is calling ......... Thanks for calling by and look forward to catching up again shortly


Gorgeous card Clare and easy to follow Tutorial ,the papers are beautiful.
ReplyDeleteEnjoy the Ballet.
Take Care
Elaine H X
Really pretty papers Clare! Love the card, appreciate instructions but prefer hearing your lovely voice!!! Hope you have a wonderful time at the Ballet. Speak to you soon.
ReplyDeleteLuv, luv, luv,
Judy in Arizona
Hi Clare, I'm loving your card, the seahorses are so cute.
ReplyDeleteOli has got his independence now haha, great that he is being useful too haha.
Enjoy your evening at the ballet.
Lots of love from Patricia xx
Voyage Beneath the Sea is a lovely G45 paper collection...interesting images. Thanks for this tutorial...easy to follow. Photos are just right. I so enjoy your projects!
ReplyDeletevery happy card. unusual colours but work really well together. not the colours i expect from g45. fab tutorial, hugs xx
ReplyDeleteHi Clare. I love your card and the papers are just fab. Thanks for sharing this. I do hope you enjoyed the ballet. I have very fond memories of seeing The Firebird in London many years ago despite crying uncontrollably at the end. Take care
ReplyDeleteMargaret A.