Hi everyone, I'm back from a short break, the house is all decorated, the grand garden tidy up is underway and WHOP WHOP the new paper collections from Graphic 45 have arrived, so I thought I'd create a dimensional frame for this beachy photo of the boys that's been on my desk for a while.
If you fancy making one yourself here's how it comes together. (full supply below). I use offcuts of chipboard to create piles of tiles (1/4" x 1/4") and strips to create the different layers in the frame.
Assemble the frame following the instructions on the reverse of the packaging. Pain the base and frame using your choice of paint. (I used PaperArtsy Southern Skies chalk acrylic). Put to one side to dry.
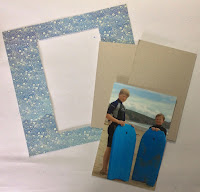
Take one sheet of 8 x 8 Turtle Time, cut out the centre section leaving a 1" border at the top and bottom of the paper and a 2" wide border at the sides. Mount your chosen picture on three layers of chipboard offcuts.
Stick the paper to the inner base of the frame. Centre and stick the photo in place over the centre cut out area. Add four layers of roughly cut chipboard strips to the edges of the blue paper.
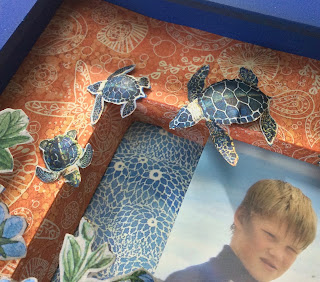
Take one sheet of 8 x 8 Sun Kissed paper, cut out the centre leaving a 1" frame. Using the centre section cut four 1" strips. Score each one lengthways at 1/2". Score two of them at 1/4" from one long edge and make a cut up to the first (1/4" score line) at either end of these two pieces. (Don't angle the corners as I did.!!) To make the frame to cover the chipboard pieces stick the 1/2" score line on the sniped strips in place along the top and bottom inner edges of the frame and the other two pieces in place on the sides of the frame.
Put a little glue on the top of the chipboard pieces in your frame and press the orange frame in place.
Take the ephemera card shown above and cut off the bottom section. Mount on three sets of two layers of 1/4" chipboard pieces and stick in place at the bottom of the frame. (See above).For the floral decoration take one sheet of 12 x 12 Floating Floral and cut out the two floral sprays from the bottom left & right of the paper. Ink the paper edges and mount each spray on piles of three layers of chipboard.
Take the 6 x 4 paper piece cut out at the start of the project. Cut out the four turtles, shape them using a ball tool or scissor handles. Stick the flower sprays and turtles in place on the orange paper.
Mount the 'Life's a Beach' sticker on three layers of chipboard and stick in place centre top of the orange paper.
Cut a few more flowers from the Floating Floral paper and stick them to the lower edge of the frame. Cut a piece of acetate 8 1/8" square and stick it to the underside fo the frame and then stick the frame to the base with glue.
To decorate the sides of the box cut four pieces 8 1/8" x 1 1/8" from 12 x 12 Sand Dollar paper. Ink the paper edges and stick in place on the sides of your frame to hide all the joints. Add a hook to the back if you want to hang your finished frame on the wall. Here's a few more pics of my finished frame.
Supply List
(Frames and papers are available from our website)
One 8 1/4" Frame Kit
Papers from the 8 x 8 Sun Kissed Paper Pad
Papers and Stickers from the 12 x 12 Sun Kissed Paper Crafting Pack
one sheet A4 2mm chipboard
Blue Paint
Paint Brush
Paper Trimmer
Vintage Photo Distress Ink Pen
Gorilla Glue & Tacky Glue
One A4 sheet Acetate
Have fun if you make one yourself.
Oli's booked me to pick up all his cardboard rubbish and take it to the tip for him today!!!! so I best get a wiggle on here. I promised myself I"d get this post published before getting up!!!! ...... and after the tip trip it's back to prep the kits for my workshop in Glasgow on Sunday. Ladies I'm really looking forward to seeing you all.
Thanks for calling by, enjoy your day and look forward to catching up again shortly. :-)


Hi Clare
ReplyDeleteI love Scrapbooking and your theme for the Photo is spot on , i love it !
Elaine
XXXX
Very very cute Clare, how fun this will be to make!! Hope your weekend to Glasgow will be a fun one and I know the ladies will be looking forward to seeing you!!!
ReplyDeleteHi Clare, Wow you are a 'busy bee', so glad you are getting everything under control, and you still have time to make this fabulous creation !! I love this, and your tutorial is fantastic and these papers are beautiful, especially the 'turtles', I love them.
ReplyDeleteLots of love from Patricia xx
Lovely project clare for old holiday beach photos, looking forward to getting back in the garden too, that time of year again for the winter clear up and planting up for lots of spring summer colours! All the best xx
ReplyDeleteLove this Clare, great photos of the boys!!! Am going to give it a go as you say!!!
ReplyDelete