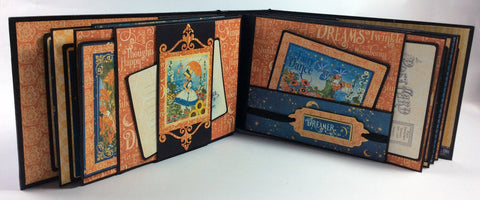
Hi everyone, I hope you've had a good week. The latest paper collections from Graphic 45 arrived here earlier this week and I've had a fun couple of days altering one of our Album in a Box kits in papers from Dreamland. If you haven't seen the collections let's dive in and take a peak at them both and then I'll take you through the project.

Dreamland - a twinkling fantasy world full of storybook delight, perfect for childrens projects, and if you take a look at the B side of the papers the collection includes some fantastic papers that will work so well as backgrounds on any project too.

In addition to the two sizes of paper pads, patterns and solids, stickers, chipboard, and ephemera there are now die cut pieces too. Each pack has 51 elements giving you even more embellishment options to add to your projects.

Life's a Journey - if you're off on vacation or creating travel memories this collection is the perfect crafting partner. In true art deco style there are planes, trains, automobiles and bicycles bought together in a colour palette of gold, red, purple, turquoise, and ocean blue. The die cut pieces are also a new addition to this paper collection.
If you'd like to take a closer look at the collections click on the video below to join me for a walkthrough.
The Album in a Box Kit

This has to be one of my all time favourite kits. It comes flat packed, is cut from high density greyboard and includes pieces to make one Box (W: 8" x D: 3" x H: 5 1/4") and one album cover set (W: 7" x H: 4 3/4" x D: 2 1/2"). The Assembly Guide (digital download) covers how to assemble the box and album using our Signature Black Construction Tape and how to make up the interior of the album ready to decorate in your choice of papers.

I used two 12 x 12 papers to decorate the outside of the box, and then added chipboard pieces, stickers and ribbon embellishments, large metal feet and a magnetic closure hidden under the heart. To finish I added a beading of Star Dust Stickles.

The 8 x 8 paper pad is the perfect size to decorate the album with. The papers work beautifully together. As always it was really hard to chose which to use on each page. I added a mix of chipboard pieces, stickers mounted on black card and die cut pieces to create additional tuck spots through the pages and the large and small ephemera cards made perfect photo mats for the pockets. Here's some pics of each of the page sets and the project video:


Join me for a close up look at todays project:
I haven't written specific instructions on how to decorate this Album in a Box however the assembly guide covers how to make the basic album and gives a generic cutting guide for papers to cover a basic page and the new style wrapped pocket page featured in this album. Links to all of the products featured in todays post and video
I hope you love these new collections as much as I do. I'll be sharing a project using the Life's a Journey collection next time so do call back to catch up on that one.
That's all from me today, thanks for calling by and have a lovely weekend and ta ta 'till next time. C :-)

Comments
Post a Comment